

Recipes from the September 2011 Newsletter
Featured Recipes
CRANBERRY CHILI BEANS
I have been using cranberry beans in place of pintos a lot lately in many of my bean dishes. They are a bit richer in taste, sweeter and cook much faster than pinto beans. They mash easily yet also are delicious and quite smooth when left whole. I usually serve this recipe on top of brown rice with a few spoonfuls of sautéed kale, broccoli and zucchini from my garden ladled over the top. And don’t forget the hot sauce!!
Preparation Time: 5 minutes
Cooking Time: 2-4 hours (see hints)
Servings: makes about 12 cups beans (see hints)
4 cups cranberry beans
12 cups water (see hints)
1 onion, coarsely chopped
4 cloves garlic, peeled and quartered
4 tablespoons tomato paste
1 ½ tablespoons chili powder
1 teaspoon cumin
Dash sea salt (optional)
Sort through the beans and place in a large pot with the water. Add the onion and garlic, cover, bring to a boil and cook for about 2 hours until tender. Add the remaining ingredients and cook an additional 15 minutes to allow flavors to blend.
Hints: To make these in a slow cooker (crock pot), place the beans in the bottom of the pot and add water until there is about 1 ½ inches of water covering the beans. Add the onion and garlic, cover, turn on high heat and cook until beans are tender, about 4 hours. Add remaining ingredients and cook for about 15 minutes until flavors are blended. If you are away from the house, these may be left to cook for a longer period of time. Add about 1 cup more water, then drain off any excess water when the beans have finished cooking, and before adding the seasonings. I make these in a large amount and then use them in other recipes during the week. Or they may be frozen for up to 6 months. This recipe may easily be cut in half if you don’t wish to have so many cooked beans on hand. Use the same amount of onion and garlic, but use 2 cups of beans and 6-7 cups of water. Halve the seasoning amounts used at the end, or adjust to taste.
Bob’s Red Mill has excellent cranberry beans sold in bags (about 4 cups) in many supermarkets. Or order online at www.bobsredmill.com. Bob’s Red Mill also sells a large variety of other healthy grain products and a large assortment of beans online and I have always found their quality to be excellent. They may also be found in most natural food stores, such as Whole Foods Market, and many supermarkets as well.
SAUTÉED GREENS, BROCCOLI & ZUCCHINI
I make this with whatever is abundant in my garden: kale, chard, bok choy, etc. I just chop everything into uniform sized pieces, place it all in a large non-stick sauté pan and cook and stir until tender.
Preparation Time: 10 minutes
Cooking Time: 5 minutes
Servings: variable
4-6 cups mixed leafy green & yellow vegetables, uniformly chopped
1 onion, sliced and separated into rings
Dash vegetable broth
Dash soy sauce
Dash red pepper flakes
All-purpose vegetable seasoning mixture as desired (see hints)
Chop all the vegetables according to what you have on hand. For example, slice zucchini into rounds, cut broccoli into florets, chop kale into bite-sized pieces. Place all the vegetables and the onion into a large non-stick sauté pan. Add a splash each of vegetable broth and soy sauce and a dash or two of red pepper flakes and vegetable seasoning mixture. Cook and stir until liquids are evaporated and beginning to brown. Continue to cook and stir until browned and tender. Serve at once, either as a side dish or over rice and beans.
Hints: There are many varieties of vegetable seasoning mixtures available at supermarkets and even Costco. Look for ones that are made from an assortment of vegetables, herbs and spices (organic, if possible) and sodium free. For example, Costco brand, Kirkland, has a fantastic organic no-salt seasoning mixture made from 21 organic spices, vegetables and herbs. This is delicious added to almost any vegetable mixture and adds a lot of flavor to a vegetable sauté without any added sodium.
CHILI CORN SOUP
This soup is wonderful served as a first course, as it may be served warm or at room temperature. It is delicious plain or with a dollop of the Tofu Chile Cream stirred into it.
Preparation Time: 10 minutes
Cooking Time: 15 minutes
Servings: 6
4 ¼ cups vegetable broth
1 small mild onion, chopped
2 tablespoons unbleached white flour
1-2 tablespoons canned chopped green chilies
4 cups frozen corn kernels, thawed
1 tablespoon chopped cilantro
Place ¼ cup of the broth in a medium saucepan. Add the onions and cook and stir for about 2-3 minutes. Stir in the flour and mix well. Add the remaining broth, about ¼ cup at a time, stirring well, until the flour is well mixed into the broth. Stir in the green chilies and the corn and heat soup to boiling. Reduce heat and cook for about 5 minutes. Remove by cupfuls into a blender jar and process briefly until slightly smooth. Return to pan and heat through. Stir in cilantro just before serving. Serve warm or at room temperature.
Hint: For a bit more heat and flavor, serve Chile Cream Sauce on the side so each person can add a dollop to their soup, if desired.
CHILI CREAM SAUCE
This is delicious and easy to make. It’s wonderful stirred into the corn soup for a bit more heat, or try it to top burritos, tacos or wraps.
Preparation Time: 5 minutes
Servings: makes about 1 cup
6-8 ounces silken tofu
2-4 tablespoons canned chopped green chilies
1 teaspoon minced garlic
Place all ingredients in a blender jar and process until smooth. Scrape sides as necessary and repeat until well processed. Place in a bowl and chill until needed.
Hint: Made be made 1 to 2 days ahead of time to allow flavors to blend.
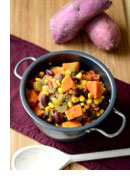
BLACK BEAN CHILI
I have been making vegetarian chili for many years. I usually start with dried beans and cook the chili for several hours to make a hearty, rich sauce. However, this chili uses canned beans, which are easy to find in most supermarkets, and is ready to serve in just 30 minutes. Sometimes I serve this over brown rice, which cooks while the chili is simmering. This makes a hearty meal for four people. It also reheats well, so saving some for the next day’s lunch is an option.
Preparation Time: 10 minutes
Cooking Time: 30 minutes
Servings: 4
½ cup vegetable broth
1 medium onion, chopped
1 bell pepper, chopped (red or green)
3 cloves garlic, minced
1 4-ounce can chopped green chilies
1 tablespoon chili powder
1 teaspoon ground cumin
1 teaspoon oregano
2 15-ounce cans black beans, drained and rinsed
1 15-ounce can fire-roasted chopped tomatoes
1 cup chunked, cooked yams
3 tablespoons chopped fresh cilantro
dash salt
Options: baked tortilla chips
Chili Cream Sauce (recipe above)
Salsa (purchased)
Place the vegetable broth in a large pot. Add onion, bell pepper and garlic. Cook and stir frequently for 3 minutes. Add green chilies, chili powder, cumin, and oregano. Cook and stir for 2 minutes. Add beans, tomatoes, and yams. Bring to a boil, reduce heat, cover, and cook for 10 minutes. Uncover and cook for 15 minutes, adding a bit more vegetable broth if the chili is too thick at this point. Stir in cilantro and salt to taste. Add optional toppings as desired.
Hints: If you don’t have cooked yams on hand, just microwave one until it is barely tender. Let cool and peel, if desired. Then cut into chunks. Use some baked tortilla chips on the side of the chili or crumble over the top. Use a tablespoon or two of Chili Cream Sauce over the top, if desired. I also like to serve this on top (or inside) of baked tortilla shells. Place corn tortillas on a flat baking sheet and bake in a 300 degree oven for 15 minutes until crispy. Or place softened corn tortillas into a tortilla shell mold and bake until crispy. Serve the chili on or in these shells, topped with Chili Cream Sauce and salsa. To make your own baked tortilla chips, buy soft corn tortillas and cut them into wedges with a scissors. Spread in a single layer on a baking sheet (or two), spritz with a fine mist of water (this makes them crispier) and bake at 300 degrees until crisp, about 15 minutes. (Some sea salt or other seasonings may be sprinkled on after misting with water for even more flavor.) Store any of these baked tortillas in an airtight bag or container.
FRENCH VEGETABLE SOUP
This soup is thick and filling and contains a wide variety of vegetables.
Preparation Time: 30 minutes
Cooking Time: 45 minutes
Servings: 8-10
8 cups water
2 onions, coarsely chopped
1 clove garlic, crushed
2 potatoes, chopped coarsely
1 stalk celery, thickly sliced
1 carrot, thickly sliced
½ pound mushrooms, sliced
4 zucchini, thickly sliced (cut in half)
2 leeks, sliced or 1 bunch green onions, sliced
2 cups chopped broccoli pieces
1 cup fresh or frozen peas
1 cup chopped cauliflower pieces
1 cup dry white wine
1 teaspoon thyme
1 teaspoon dill weed
1 teaspoon marjoram
1 teaspoon basil
3 tablespoons soy sauce
Freshly ground black pepper
Place 8 cups water in a large soup pot. Add onions, potatoes, garlic, celery and carrots. Bring to a boil, reduce heat, cover, and simmer for 15 minutes. Add remaining ingredients, cook an additional 30 minutes.
HINTS: If you don’t have any white wine on hand, use a cup of vegetable broth instead. Sprinkle with finely chopped green onions before serving, if desired.
MANHATTAN BEAN SOUP
Preparation Time: 30 minutes
Cooking Time: 3 hours
Servings: 8
7 cups water
1 cup Great Northern beans
½ cup dried baby lima beans
1 onion, chopped
1 stalk celery, chopped
1 large potato, chopped
1 16 ounce can chopped tomatoes
2 tablespoons soy sauce
½ teaspoon ground coriander
½ teaspoon dry mustard
½ teaspoon cinnamon
½ teaspoon ground ginger
Dash of white pepper
1½ cups soy or rice milk
Place beans and water in a soup pot. Bring to a boil, reduce heat, cover and cook about 2 hours. Add vegetables and seasonings. Cook an additional hour. Remove 1 cup of soup and process in blender until smooth. Add milk and mix well. Add this mixture back to soup pan. Stir until heated through.
BAKED POTATO SALAD
This is great for a quick lunch, especially if you have leftover baked potatoes and/or green beans in your refrigerator. (I always make extras for this purpose.)
Preparation Time: 30 minutes
Cooking Time: 1¼ hours
Servings: 4
4 potatoes
2 cups sliced green beans, cooked
4 cups coarsely shredded lettuce
2 tomatoes, chopped
½ cup celery, thinly sliced
½ cup radishes, thinly sliced
¼ cup green onions, chopped
¼ cup oil-free salad dressing of your choice
Wash potatoes, prick with a fork and bake at 400 degrees until done. Cook green beans in a small amount of water until just tender. Drain. Set aside. (Use frozen green beans, if desired, and thaw in cold water. It is not necessary to cook these, unless you wish to.) Combine lettuce, tomatoes, celery, radishes, onions and green beans. Chill. To serve, slice baked potatoes in half, then cover with some salad mixture. Top all of this with your choice of no-oil salad dressing.
HINT: The potatoes may be used at room temperature or chilled, depending on your preference. The topping mixture made be made ahead and chilled. This makes it easy to take this lunch with you to work and then assemble ingredients just before eating.
BUDDHA’S DELIGHT
I enjoyed this dish at one of our local Chinese restaurants a few nights ago, and decided to come home and make it for myself the next night. (I enjoyed my version even more than the restaurant version.)
Preparation Time: 30 minutes
Cooking Time: 25-30 minutes
Servings: 8
Vegetables:
4 cups broccoli flowerets (or use some cauliflower with the broccoli)
1 ½ cups carrots, sliced
½ cup green onions, sliced
2 cups sliced mushrooms
2 cups bok choy, sliced thinly
2 cups snow peas
½ cup bamboo shoots, sliced
½ cup sliced water chestnuts
½ cup whole straw mushrooms (canned)
1 cup whole baby corn (canned)
Sauce:
1½ cups water
2 tablespoons sherry (or apple juice)
4 tablespoons soy sauce
3 tablespoons cornstarch
¼ teaspoon white pepper
Prepare vegetables as directed and set aside separately. Combine sauce ingredients in a separate bowl and set aside.
In a wok or a large saucepan, place about 1/2 cup water and a dash or two of soy sauce. Heat until it boils, then add broccoli, carrots and green onions. Cook and stir for about 10 minutes. Add mushrooms, bok choy and snow peas. Cook and stir for 5 minutes. Add bamboo shoots and water chestnuts. Cook and stir a few more minutes. Add sauce mixture to pan. Bring to a boil, stirring constantly. After mixture boils and thickens, stir in straw mushrooms and baby corn. Cook until heated thoroughly. Serve over brown rice.
HINT: Buddha’s delight is a popular vegetarian dish in China. There are many variations but one thing they share in common is at least 10 different vegetables are used in the preparation. You may vary the vegetables used according to what you have available in your refrigerator and pantry.
SUMMER STEW
Preparation Time: 30 minutes
Cooking Time: 30 minutes
Servings: 6-8
1 ¼ cups water
2 onions, sliced
2 cloves garlic, crushed
6 small zucchini, sliced ½ inch thick
4 small yellow crookneck squash, sliced ½ inch thick
1 green or red pepper, coarsely chopped
2 cups snow peas, trimmed and left whole
3 cups tomato chunks
2 cups corn kernels
3 tablespoons soy sauce
Seasonings (see note under hints)
1 tablespoon cornstarch
Sauté onions and garlic in ½ cup water in a large saucepan. Cook until soft, about 5 minutes. Add both kinds of summer squash, green or red pepper, snow peas, and tomatoes, plus another ½ cup water. Cover and simmer over medium heat for 15-20 minutes. Stir occasionally. Add corn and chosen seasonings. Simmer an additional 10 minutes. Mix cornstarch in ¼ cup cold water. Gradually add to stew while stirring. Cook and stir until thickened. Serve hot over whole grains.
HINTS: This is a very low calorie stew. It is delicious with many different seasonings. Choose one of the four seasoning mixtures here, or use your own favorites.
1. 1 teaspoon turmeric, 1 ½ teaspoons ground cumin, 1 teaspoon curry powder, 1 tablespoon chopped fresh cilantro.
2. 1 teaspoon dried basil or 1 tablespoon fresh basil, chopped, 1 teaspoon dried oregano or 1 tablespoon fresh oregano, chopped, 1 tablespoon parsley, chopped, dash lemon juice.
3. ½ teaspoon basil, 1 teaspoon dill weed, 1 teaspoon paprika
4. ½ teaspoon thyme, ½ teaspoon rosemary, ½ teaspoon marjoram, ½ tablespoon Dijon mustard.
PANZANELLA
Panzanella is another name for bread salad. This is a great way to use up some bread that is a couple of days old and it’s fantastic with fresh heirloom tomatoes available all over at this time of year. See hints below to change salad ingredients according to your preferences.
Preparation Time: 20 minutes
Resting Time: 15 minutes
Servings: 4
4 very ripe heirloom tomatoes, chopped
2 small avocados, peeled and chopped
2 cloves fresh garlic, pressed
¼ cup chopped green onions
3 cups cubed fat-free French or Italian style bread (1 or 2 days old)
½ cup fat free Balsamic vinaigrette (see recipe below)
2 tablespoons chopped fresh cilantro or parsley
Place the tomatoes, avocados, garlic, and green onions in a large bowl and mix well. Add bread to the vegetable mixture and toss to mix. Add the dressing and cilantro or parsley and toss again. Let rest for at least 15 minutes before serving to allow dressing to soak into the bread somewhat.
Hints: To make this into a lower fat salad, omit the avocado and use 1 cucumber, seeded and chopped and 1 bell pepper in place of the avocado. Add some shredded fresh basil, if desired. Instead of the chopped green onions, used freshly chopped sweet onions, that have been rinsed according to directions in this newsletter under “Kitchen Hints”.
BALSAMIC VINAIGRETTE
This will keep in the refrigerator for several weeks.
Preparation Time: 10 minutes
Chilling Time: 2 hours
Servings: makes 2 ½ cups
1 cup water
¼ cup balsamic vinegar
¼ cup apple cider vinegar
¼ cup red wine vinegar
¼ cup unseasoned rice vinegar
3-4 gloves garlic
¼ cup ketchup
1 tablespoon Dijon mustard
1-2 tablespoons agave nectar
½ teaspoon xanthan or guar gum
Place all ingredients in a blender jar and process until very smooth and emulsified. Taste for sweetness and add more agave to taste if necessary. Chill in refrigerator for at least 2 hours. Dressing will thicken as it chills.
Hints: Use the best quality vinegars you can find for the best flavored dressing. Xanthan or guar gums are excellent thickeners for oil-free salad dressings because they thicken without heat as the dressing chills in the refrigerator.
CORKSCREW PASTA WITH FRESH TOMATO SAUCE
By Linda Vallin
This email was sent to me a few weeks ago by a long-time follower (and frequent recipe contributor) and it was so delicious and easy that I wanted to share it with you.
Linda writes:
“I thought you would like this pasta recipe that I improvised last night. I had a few too many farmer’s market heirloom tomatoes that were just on the verge of being over-ripe. It was warm, it had been a long day, and I didn’t feel like cooking. Not expecting much, I threw this together with what I had on hand, and boy was I surprised at how good it tasted! Simple things are sometimes the best. This tastes delicious. The hot pasta warms the sauce a bit but doesn’t cook it. I enjoy your recipes often, and I am relying on the iPhone/iPad recipe app a lot.”
Preparation Time: 10 minutes
Cooking Time: 8-10 minutes for pasta
Servings: 4-6
1 pound whole wheat corkscrew-shaped pasta
2 large cloves garlic, peeled
I small bunch basil, washed and dried
3 very large, very ripe heirloom tomatoes
Pinch of salt (optional)
Freshly ground pepper
Cook pasta according to package directions. While it is cooking, pulse the garlic in a food processor until chopped fine. Scoop the garlic into a bowl, then add the basil leaves (no stems) to the food processor, pulse until chopped fine, and add to the bowl. Finally, chop the tomatoes into large pieces so they will fit into the food processor, and pulse until they are the consistency of your favorite salsa. Add the tomatoes, salt (if using) and freshly ground pepper to taste to the bowl and stir. Pour over cooked pasta. Done!
MARY’S KITCHEN HINTS
Dried Tomatoes
We have an overabundance of tomatoes in our garden this year. Last year’s tomato harvest was quite skimpy and John really wanted to avoid that this year so he planted a LOT of tomato plants this year. Now I have way more tomatoes than we can use or even give away and so we have become fans of dehydrated tomatoes! It couldn’t be easier. Just slice the tomatoes rather thinly, no need to core or peel, and place on drying trays. Dry for about 15-18 hours and you’ll have delicious dried tomatoes to eat for days or weeks afterwards. They may also be reconstituted by soaking in hot water for about 15 minutes (then draining) to use in recipes calling for sun-dried tomatoes. Or to give an intense tomato flavor to any recipe! Store in an airtight covered container at room temperature. I have an Excalibur 3500 Dehydrator that I love. It is easy to use and it’s been working full time this year, with tomatoes, plums and apples so far. Look for it online at www.amazon.com. If you don’t want to invest in a dehydrator, tomatoes may also be dried in your oven to various degrees of dryness. Cut small tomatoes in half and slice larger ones into thin slices, the same as you would for a dehydrator. Place tomatoes on a baking sheet lined with parchment paper and bake at 250 degrees until tomatoes are shrunken slightly and dried to the consistency you’d like them. This will take between 1-6 hours, depending on the size of the tomatoes and the amount of dryness you prefer. To store, let cool and store in an airtight container in the refrigerator or freezer. (You’ll notice these need refrigeration while the dehydrated ones do not.) Tomatoes may also be roasted at a higher temperature to slightly dry them and intensify their flavor. This works best with medium sized tomatoes that are the perfect size to cut in half. Place them cut side up on a parchment lined baking sheet and roast at 350 degrees for about 1 hour. Cool and store in a covered container in the refrigerator for up to 5 days, or freeze for later use.
Perfect Rice
There are so many different kinds of rice that are available these days that finding one method that successfully cooks all kinds of rice to perfection can be difficult, if not impossible. Fortunately there is a solution: cook your rice as if you were cooking pasta and you will have perfect rice every time, no matter what kind of rice you are cooking. Bring a large pot of water to a boil (at least 6-8 times more water than rice) and when the water is boiling add the rice, mixing in well to avoid clumps. Cook at a rolling boil and check for doneness frequently, starting at 10 minutes for white rice and 25 minutes for brown rice. Drain rice in a colander with small holes as soon as it is tender and place into a large bowl. Serve at once. (If you are not serving right away, leave in colander to drain, and then reheat in bowl just before serving.) This method keeps your rice from becoming a sticky goo.
Mild Onions
Many of you have problems with eating and digesting raw onions. Rinsing onions after they are chopped or sliced can help with this problem by rinsing off some of the sulfurous compounds from the raw onions. Place chopped or sliced onions in a colander and rinse and pat dry before using raw in a salad. John and I take this one step further: after rinsing the raw onions, I place them on a plate and microwave for a minute or two to break down these irritating substances even more. Now we enjoy sliced onions on our veggie burgers and sandwiches again!
Recommended Articles

What is the Best Formulation of Vitamin B12?

When Friends Ask: Where Do You Get Your Calcium?